Android下引入rust库
本文介绍了如何在Android项目中,引入rust lib.
背景
最近在看Android下面的高性能kv store, 突然想到的这个idea,找个高性能的rust kvstore集成到Android项目,然后通过jni调用, 不就完了吗. 然后就一脚踩到坑里面了.
Jni是一个非常成熟的机制了,通过rust导出C函数也是非常可靠的,所以在实现上是非常简单的,可以考虑的问题有
- 如何方便的增加新的接口
- 如何log native code的错误
- 如何进行性能优化
实现
- 完成一个简单的jni调用
- 增加proto支持
- 更好的封装protobuf
- 集成一个lmdb
- tunning
- MMKV
实现一个简单的jni调用
- 在Kotin里面定义两个函数,一个返回值,一个传入callback 这些函数加载的lib文件是 librsdroid.so
package com.linkedin.android.rsdroid;

import com.linkedin.android.rpc.NativeImpl

class RustCore {
    external fun greeting(): String
    external fun callback(cb : Callback)
    init {
        System.loadLibrary("rsdroid")
    }

    interface Callback {
        fun onSuccess()
    }
}
- 在rust文件里面实现对应的功能
#[no_mangle]
// 注意函数的名字需要与Kotin类对应
pub unsafe extern fn Java_com_linkedin_android_rsdroid_RustCore_greeting(env: JNIEnv, _: JClass) -> jstring {
    let world_ptr = CString::new("Hello world from Rust world").unwrap();
    let output = env.new_string(world_ptr.to_str().unwrap()).expect("Couldn't create java string!");
    output.into_inner()
}

#[no_mangle]
pub unsafe extern fn Java_com_linkedin_android_rsdroid_RustCore_callback(
    env: JNIEnv,
    _class: JClass,
    callback: JObject,
) {
    env.call_method(callback, "onSuccess", "()V", &[])
        .unwrap();
}
其中比较重要的是rust里面函数的签名,需要跟Kotlin类保持一致,同时在rust里面调用kotin的回调的时候,要看看对应的函数签名 ( 通过kotlinc RustCore.kt 看看生成的.class文件就可以了,把^A^C啥的去掉就可以了)
onSuccess^A^@^C()V^A^@^QL
- 将rust编译成librsdroid.so, 放到Kotlin工程里面, 比较麻烦的办法是先编译ndk的toolchain,然后用toolchain编译对应的arm, arm64, x86的librsdroid.so, 然后放到Android工程里面。 现在有更简单的办法, 插件 org.mozilla.rust-android-gradle.rust-android
android {
...
ndkVersion "22.1.7171670"
...
}

apply plugin: "org.mozilla.rust-android-gradle.rust-android"

cargo {
    module = "../rslib-bridge"
    libname = "rsdroid"
    targets = ["x86", "arm", "arm64"]
    profile = 'release'
    prebuiltToolchains = true
    apiLevel = 21
    verbose = true
}
以上就完成了jni的调用,非常的直接,但是现在的方案也有一些问题
- 只能传int, Sting等类型
- 需要写对函数的参数,回调之类,否则可能就会crash
通过一个固定的protocol,我们可以方便的解决这些问题,protobuf是一个相对合适的方案
在项目中引入protobuf
protobuf 也是非常成熟的项目了,给定一个proto文件,在rust和java端都可以生成合适的代码,但是怎么让他们一起work是一个问题。
首先写一个proto文件,定义一个rpc服务
syntax = "proto3";

package Proto;
option java_package = "com.linkedin.android.proto";

service DroidBackendService {
    rpc Hello(HelloIn) returns (HelloOut);
    rpc Sink(Empty) returns (Empty);
}

message HelloIn{
    int32 arg = 1;
}

message HelloOut{
    sint32 ret = 1;
    repeated string msg = 2;
}

message Empty {}
- 在rust中增加proto支持 通过引入 prost 生成对应的模版trait: DroidBackendService 这样我们保证数据的输入输出都是[]byte, 然后将方法都封装在run_command_bytes2_inner_ad里面
use prost::Message;
pub type BackendResult<T> = anyhow::Result<T>;
pub trait DroidBackendService {
    fn run_command_bytes2_inner_ad(&self, method: u32, input: &[u8]) -> BackendResult<Vec<u8>> {
        match method {
            1 => {
                let input = HelloIn::decode(input)?;
                let output = self.hello(input)?;
                let mut out_bytes = Vec::new();
                output.encode(&mut out_bytes)?;
                Ok(out_bytes)
            }
            2 => {
                let input = Empty::decode(input)?;
                let output = self.sink(input)?;
                let mut out_bytes = Vec::new();
                output.encode(&mut out_bytes)?;
                Ok(out_bytes)
            }
            _ => Err(anyhow::anyhow!("invalid command")),
        }
    }
    fn hello(&self, input: HelloIn) -> BackendResult<HelloOut>;
    fn sink(&self, input: Empty) -> BackendResult<Empty>;
}
然后我们可以定义具体的服务实现trait
pub struct Backend {
}

impl Backend {
    pub fn new() -> Backend {
        Backend{}
    }
}

impl DroidBackendService for Backend {
    fn hello(&self, input: HelloIn) -> BackendResult<HelloOut> {
        Ok(HelloOut {
            ret: input.arg,
            msg : (0..input.arg).map(|_| "hello".to_owned()).collect(),
        })
    }

    fn sink(&self, input: Empty) -> BackendResult<Empty> {
        Ok(Empty{})
    }
}
最后,这个服务导出成一个函数
#[no_mangle]
pub unsafe extern fn Java_com_linkedin_android_rsdroid_RustCore_run(
    env: JNIEnv,
    _: JClass,
    command: jint,
    args: jbyteArray,
    cb : JObject,
) {
    let mut backend = Backend::new();

    let result = catch_unwind(AssertUnwindSafe(|| {
        let command: u32 = command as u32;
        let in_bytes = env.convert_byte_array(args).unwrap();
        return backend.run_command_bytes2_inner_ad(command, &in_bytes);
    }));

    if cb.into_inner().is_null() {
        return
    }

    match result {
        Ok(Ok(_s)) => {
            let data = env.byte_array_from_slice(&_s).unwrap();
            env.call_method(cb, "onSuccess", "([B)V", &[data.into()]);
            return
        }
        _ => {
            let world_ptr = CString::new("error").unwrap();
            let output = env.new_string(world_ptr.to_str().unwrap()).expect("Couldn't create java string!");
            env.call_method(cb, "onErr", "(ILjava/lang/String;)V", &[10.into(), output.into()]);
            return;
        }
    }
}
这样在java里面就可以通过传入protobuf数据,来获得protobuf回调了 在java里面生成对应的类,需要用到 protobuf-gradle-plugin
def droidProtobufFolder = new File(rootDir, "rslib-bridge/proto").getAbsolutePath()

## 配置proto文件路径
android {
    sourceSets {
        main {
            proto {
                srcDir droidProtobufFolder
            }
        }
    }
}


## 生成java类
protobuf {
    plugins {
        javalite {
            artifact = 'com.google.protobuf:protoc-gen-javalite:3.0.0'
        }
    }
    protoc {
        artifact = 'com.google.protobuf:protoc:3.8.0'
    }
    // this is a task which wil generate classes for our proto files
    generateProtoTasks {
        all().each { task ->
            task.builtins {
                remove java
            }
            task.plugins {
                javalite {}
            }
        }
    }
}
这样我们就能在代码里面调用了
val builder = AdBackend.HelloIn.newBuilder();
val arg = builder.setArg(1000).build();
RustCore.instance.run(1, arg.toByteArray(), object : ProtoCallback {
    override fun onErr(code: Int, msg: String) {
        Log.d("MainActivity", "msg");
    }

    override fun onSuccess(out: ByteArray) {
        val helloOut = AdBackend.HelloOut.parseFrom(out);
        Log.d("MainActivity", helloOut.toString());
    }
});
这样,我们就完成了Koltin 和 rust的交互,但是还有后一个问题,为什么要传cmd_number, 能不能让java和rust一样,把method number封装起来。
更好的封装protobuf
好消息,我们可以通过自定义的protobuf插件,调整生成的java类
protobuf {
    // python脚本的地址
    String protocGenPath = OperatingSystem.current().isWindows() ? 'tools\\protoc-gen\\protoc-gen.bat' : 'tools/protoc-gen/protoc-gen.sh'
    File f = new File(project.rootDir, protocGenPath)
    if (!f.exists()) {
        throw new IllegalStateException("'${f.absolutePath}' does not exist")
    }

    //  自定义的plugin
    plugins {
        // Define a plugin with name 'anki'.
        native_rpc { path = f.absolutePath }
    }

    // this is a task which wil generate classes for our proto files
    generateProtoTasks {
        all().each { task ->
            // 执行plugin对proto文件进行解析
            task.plugins {
                native_rpc {}
            }
        }
    }
然后通过自定义的python文件,我们可以自动生成cmd。
package com.linkedin.android.rpc;

import java.lang.annotation.Retention;
import androidx.annotation.IntDef;
import java.lang.annotation.RetentionPolicy;
import androidx.annotation.Nullable;
@IntDef ({
NativeMethods.HELLO,
NativeMethods.SINK
})
public @interface NativeMethods {
    int HELLO = 1;
    int SINK = 2;
}
这样我们可以用cmd来调用
RustCore.instance.run(NativeMethods.SINK, Native.Empty.getDefaultInstance().toByteArray(), null);
也可以封装得更彻底一点,生成如下的代码
public abstract class NativeImpl {

protected abstract void executeCommand(final int command, byte[] args, RustCore.ProtoCallback cb);

// 自动生成测代码
public void hello(Native.HelloIn args, RustCore.Callback<Native.HelloOut> cb) {
    byte[] result = null;
    executeCommand(1, args.toByteArray(), new RustCore.ProtoCallback() {
        @Override
        public void onErr(int code, @NonNull String msg) {
            cb.onErr(code, msg);
        }
        @Override
        public void onSuccess(@NonNull byte[] out) {
            Native.HelloOut message = null;
            try {
                message = Native.HelloOut.parseFrom(out);
            } catch (InvalidProtocolBufferException e) {
                e.printStackTrace();
            }
            cb.onSuccess(message);
        }
    });
    }
}
然后外面用一个helper包装一下
 public abstract class NativeImpl
 inner class NativeHelp : NativeImpl() {
        override fun executeCommand(command: Int, args: ByteArray?, cb: ProtoCallback?) {
            run(command, args!!, cb);
        }
    }
就可以很方便(并不是)的调用了
RustCore.navHelper.hello(
            Native.HelloIn.newBuilder()
                .setArg(10).build(),
            object : RustCore.Callback<Native.HelloOut> {
            override fun onErr(code: Int, msg: String) {
                Log.d("MainActivity", "msg");
            }

            override fun onSuccess(arg: Native.HelloOut) {
                Log.d("MainActivity", arg.toString());
            }
        });
但是这样也存在一些问题
- cmd_number是固定的
- 没有办法实现zerocopy
- 对于mutliple proto 文件的支持,需要改java插件和rust自定义build
这些都可以慢慢优化,但是我们可以开始测试一下集成lmdb了...
集成lmdb
集成kvstore,对于java来说完全是透明的,所以我同时集成了lmdb 和 sled, 只需要实现 DroidBackendService 的trait就可以了
fn open(&self, input: Str) -> BackendResult<Resp> {
        match useEnd {
            End::LMDB=> {
                lmdb::open(Path::new(&input.val))
            }
            End::SLED => {
                db::open(Path::new(&input.val));
            }
            _ => {}
        }
        Ok(Resp{
            ret : 0,
            msg: "".into(),
        })
    }
这里面需要注意的问题是,所有的save和get操作,需要在open之后进行,但是rust又有一些该死的可变不可变的检查,所以我用了一些锁来保证store的正常初始化,然后利用 unsafe 来修改static.
use once_cell::sync::Lazy;


static mut KV_STORE : Option<Bucket<Raw, Raw>> = None;
static KV_LOCK: Lazy<RwLock<bool>> = Lazy::new(|| RwLock::new(false));

pub fn open(path : &Path) {
    let mut kv_lock = KV_LOCK.write().unwrap();
    if *kv_lock == true {
        panic!("already opened")
    }
    fs::create_dir_all(&path).unwrap();
    let mut cfg = Config::new(path);
    let store = Store::new(cfg).unwrap();
    *kv_lock = true;
    unsafe {
        *KV_STORE.borrow_mut() = Some(Arc::new(store.bucket::<Raw, Raw>(None).unwrap()))
    }
}
编译很不顺利,跑起来也很不顺利。。。因为在rust打印堆栈信息,所以我又引入了 android_log输出日志到logcat
# Cargo.toml
android_logger = "0.10"
log = "0.4.14"

# lib.rs

#[allow(non_snake_case)]
#[no_mangle]
pub extern "system" fn JNI_OnLoad(vm: JavaVM, _: *mut c_void) -> jint {
    android_logger::init_once(Config::default().with_tag("RustNativeCore").with_min_level(log::Level::Trace));
    JNI_VERSION_1_6
}


...
let result = catch_unwind(AssertUnwindSafe(|| {
    panic::set_hook(Box::new(|_| {
        let backtrace = Backtrace::new();
        log::error!("ops: {:?}", backtrace);
    }));
    ...
}))
...
这样在logcat里面,我发现是文件路径不对,修改完成之后,就可以正常工作了。
但是,一顿操作猛如虎,结果发现,引入了rust之后,性能还不如SharedPrefrence...
拉垮,超出我的想象
| 接口 | 1000次用时 |
|---|---|
| SharedPrefrence.set(String, String) | 410ms |
| SharedPrefrence.get(String) | 16ms |
| Native.Sled.set(String, String) | 900ms |
| Native.Sled.get(String) : String | 800ms |
tunning
本来以为是一个结束,没想到工作才刚刚开始,我又试了一下空接口
#[no_mangle]
pub unsafe extern fn Java_com_linkedin_android_rsdroid_RustCore_empty(env: JNIEnv, _: JClass) {
}
| 接口 | 1000次用时 |
|---|---|
| Native.empty | 1ms |
所以问题出现在参数传递上,对于简单的读取和返回String, 就挺耗时的了
| 接口 | 1000次用时 |
|---|---|
| Native.testStringGet() : String | 129ms |
| Native.testStringSet(String) | 28ms |
根据jni优化的方法,可以选择方向有
- 直接传入指针 (GetByteArrayElements)
通过get_byte_array_elements获取数据
pub unsafe extern fn Java_com_linkedin_android_rsdroid_RustCore_testByte(env: JNIEnv, _: JClass, input : jbyteArray) {
    let input = env.get_byte_array_elements(input, ReleaseMode::NoCopyBack).unwrap();
}
通过 set_byte_array_region 写入数据
pub unsafe extern fn Java_com_linkedin_android_rsdroid_RustCore_testByte(env: JNIEnv, _: JClass,  output: jbyteArray) {
    let input = env.get_byte_array_elements(input, ReleaseMode::NoCopyBack).unwrap();
}
看上去也没有什么变化
| 接口 | 1000次用时 |
|---|---|
| Native.testByteArray(ByteArray) 空接口 | 2ms |
| Native.testByteArray(ByteArray) | 100ms |
| Native.getByteArray(output : ByteArray) | 170ms |
- 传入字节缓冲区 (ByteBuffer)
通过 get_direct_buffer_address 直接获取参数地址,但是也并没有改善
| 接口 | 1000次用时 |
|---|---|
| Native.testByteArray(ByteBuffer) 空接口 | 0ms |
| Native.testByteArray(ByteBuffer) | 100ms |
| Native.getByteArray(output : ByteBuffer) | 200ms |
所以,看上去,只要是在native里面读写了java的数据,那就是100ms起...
这个时候头都要秃了, 我就准备默默的把这个库删掉了,然后我就用真机测试了一下,结果居然还不错。。。
更新
- 我发现可以在rust直接拿到入参的指针,这样能更快的解析protobuf.
- 通过类似的方式,甚至可以在java实现类似mutliple return value的效果
- 通过为了防止rust lib 和 java lib不同步,增加了signature校验
- rust的稳定性不错,没崩, 就是编译有点费头发
- Sled 是挺顶的,比内存就差一点,如果加个java 缓存,说不定就起飞了. 但是还不太能用在产品系统,因为
- 不支持multi proccess
- Sled写文件是定时,默认是200ms,可能丢一点点数据...
- Lmdb 还可以,但是没有想象中的好, 能用.
- 对于小的kv存取,jni的开销可能还是稍微大了一下,但是用在网络上面,应该会有更好的表现。
- 有了protobuf,rust就可以跟其他语言联调了,所以下一次我可能要搞搞flutter
MMKV
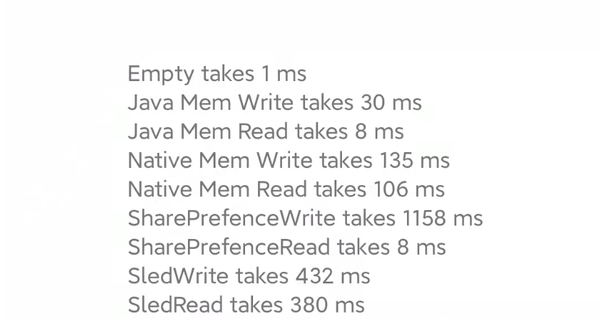
本来以为可以收尾了,手贱集成了MMKV,然后脸被打肿了, MMKV 的速度,基本上java map差不多了,然后看了一下他们的源码,感觉没用什么黑科技啊,然后,我就发现
- log耗时大概100ms
- protobuf encoding / decoding 大概100ms
这样算起来, sled 跟 MMKV也差不了多少了,就酱.
参考文档:
JNI tips | Android NDK | Android Developers
How to Idiomatically Use Global Variables in Rust - SitePoint
google/protobuf-gradle-plugin: Protobuf Plugin for Gradle (github.com)
spacejam/sled: the champagne of beta embedded databases (github.com)